Ever watched your favorite content creator’s early stuff on their YouTube channel and been blown away by how… bad the audio is? Many started out with just a smartphone and no video editor at all. It’s an important stage of any YouTuber’s development. But they got more professional at some point. They succeeded. And, they did it while building their YouTube setup.
Now it’s your turn.
You’ve been on a roll with your recent YouTube content – that means it’s time for your “early phase” to end and level up your YouTube video setup for making bass guitar videos. But, you’re still on a budget and have limited time and space for an elaborate setup. This is the article for you.
In this article, you’ll learn:
- the minimum viable setup for getting the best audio & video of your bass playing
- the best gear, if you’re a bass player, on a budget, have limited time, and/or don’t have a dedicated studio space
Let’s get started.
Disclaimer: I’m reader-supported. So, when you buy through links on my site, I may earn an affiliate commission. Having that said, this article does contain affiliate links that I receive a small commission for at no cost to you. These are what I use for making YouTube videos and I fully recommend trying them out. You can read my full affiliate disclosure in my privacy policy in the footer.
Minimum Viable YouTube Studio Setup For The Best Audio & Video
As a parent of a toddler, with two neurotic cats, and loud neighbors, interruptions are inevitable in my household. In fact, I consider it a huge win if I even publish a 5 minute video on YouTube. So, I wanted a YouTube studio setup that was super-simple, in case the window of time I had to record videos was less than 30 minutes.
The Minimum Viable YouTube Setup
Here’s an overview of what I consider to be an excellent minimum viable setup for getting the best audio and video for YouTube. This is a great YouTube setup for beginners creating videos, because you have minimal friction to start recording.
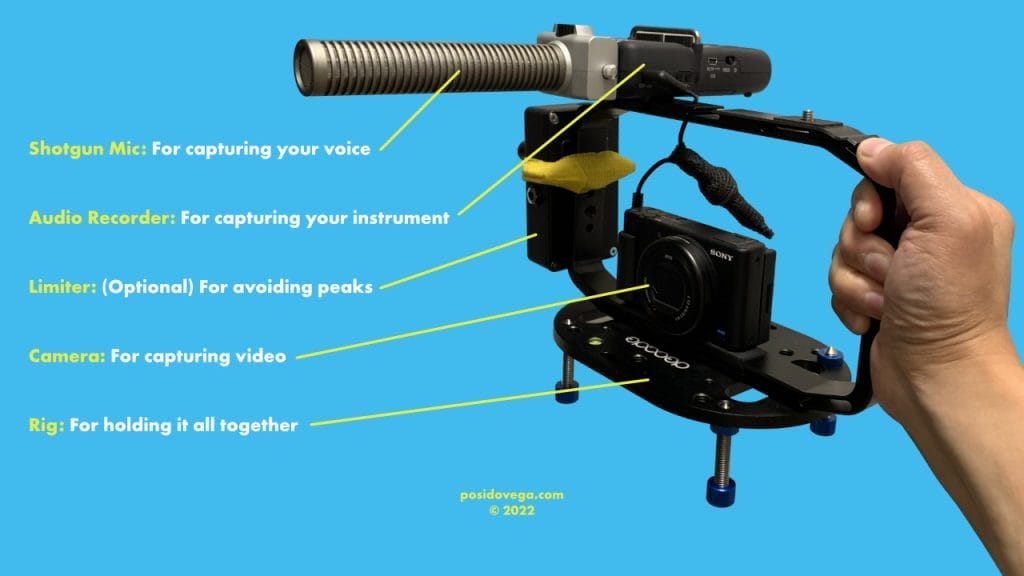
With this setup, I am able to hit the record button with minimal friction and the results have been consistent and high quality.
It’s a low profile setup that I can always leave up and it’s portable, in case I want to make instructional bass videos outside of the comfort of my home.
If you new to making bass guitar videos or want to start a YouTube channel, consider these requirements for a decent starter setup that works.
My Requirements for the Perfect YouTube Setup For Beginners
- Low-cost: I already have a lot of expenses in my life. I really didn’t want to add that much more to it unless I really needed to.
- Easy to setup or leave once setup: I have a pretty chaotic and small apartment.
- Short learning curve: I’m over 40 years old. I simply don’t learn as fast as I used to when I was younger.
- Provides consistent results: I didn’t want to be fidgeting around each time to get a result that I liked.
- Good audio: I just wanted a clean sound that was better than the built-in mic on the camera. I also wanted my bass guitar to sound good.
- Good video quality, especially in low light: I don’t always have the chance or space for my lights. Most of the time, it’s the regular lights in my room.
- Fast auto-focus: The last thing I needed was to spend time making a video only to find out it was blurry. That happened to me before with an older setup.
- Little to no post-production: I needed a setup where the audio went straight into the camera, so that I didn’t have to deal with syncing the audio afterwards.
I did a ton of research to find what I consider a bare minimum highly-productive setup on a reasonable budget. I hope this article saves you a ton of time and money!
Here’s an example of the audio and video quality I get with this exact setup.
Next, I’ll go more into the details of each piece of this puzzle.
Best Gear If You Have Limited Time, Budget, And Space
The following gear is what I use for making my instructional bass guitar videos on YouTube. This camera setup will get you great audio and video if you just want to record yourself playing bass covers, playing along to a track, or teach with your instrument. The production value is enough to get the job done with a decent quality and just what you need to get started.
The Best Audio For Your Voice And Instrument
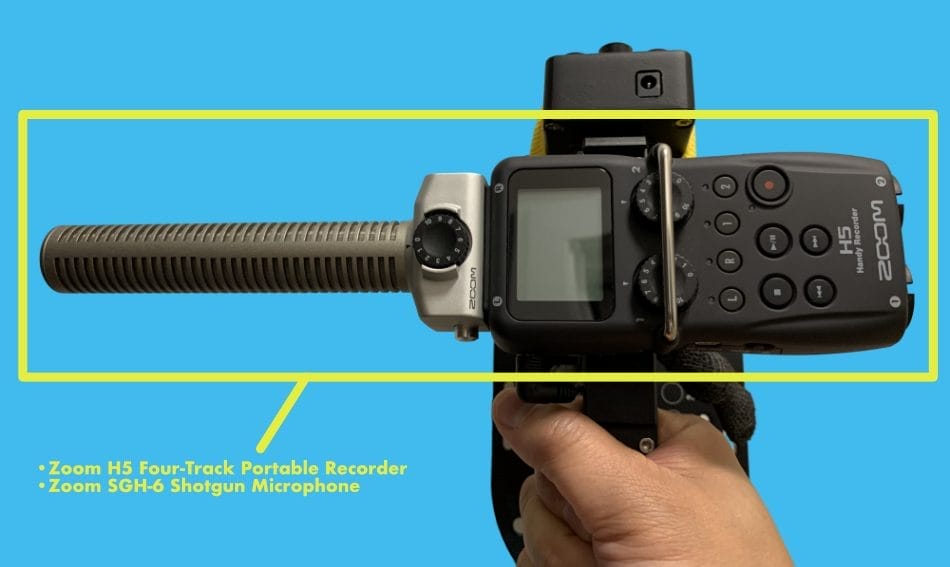
To get the best audio for both my voice and instrument, I use the following combination of Zoom products.
My Personal Experience
My bass guitar plugs directly into the Zoom H5. This gets me a clean sound with minimal background noise. I can also make videos in the middle of the night and not bother anyone with the sound of my bass.
A huge plus with this setup, is that the Zoom H5 has a line out that can connect directly to my camera, without the need of an attenuation cable. This allows me to capture the sound of my voice and bass guitar clearly, without having to sync up the audio in post-production.
Pros:
- Easy to setup.
- Sounds great from the start.
Cons:
- The shotgun mic could have more body to the audio. But, it gets the job done.
The Best Point and Shoot Camera For YouTubers
My Personal Experience
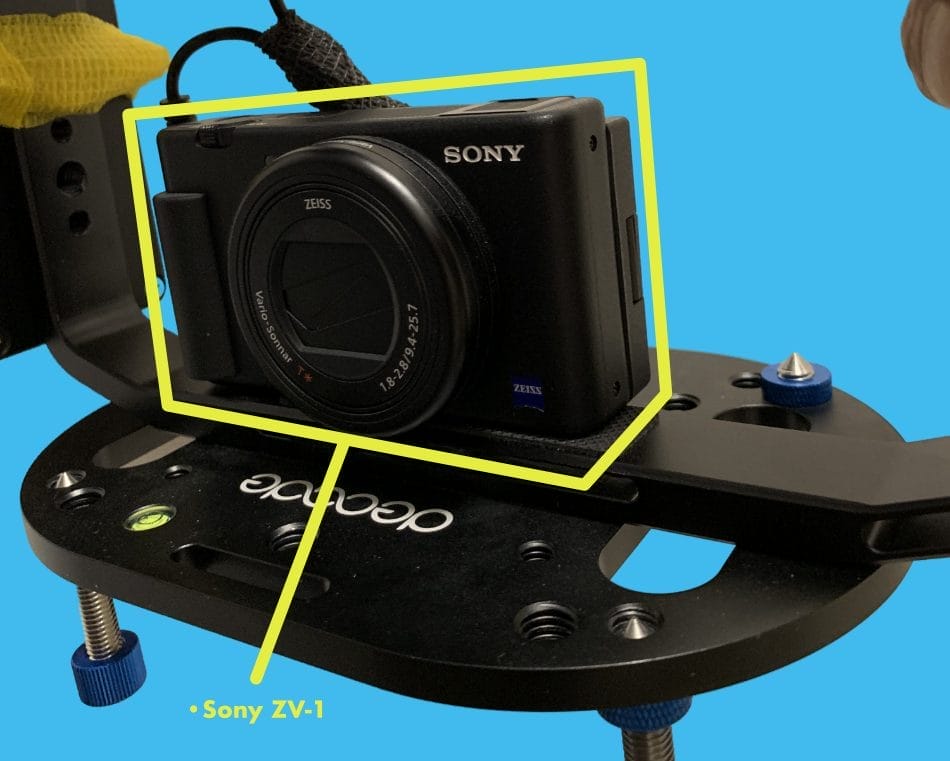
The quality of the Sony ZV-1 is amazing, especially in low-light settings. Most of my videos are shot in my hallway, with just the hallway light on. This camera doesn’t struggle to focus one bit, even with low light,. The auto-focus is very quick and the colors are vivid. I literally just hit the record button and that’s it.
Another bonus I really like with this camera is that I don’t even bother with a lighting setup. With my life situation, I really don’t have the time, space, or energy to setup lights. When I’m ready to take my videos to the next level, I’ll consider lights. But, for now, this camera shoots amazingly well in low-light environments!
Pros:
- Super-easy to use.
- The auto-focus is very fast.
- Works very well in low-light.
Cons:
- The battery is the worst. Make sure to buy extra rechargeable batteries and always have them fully charged and on hand. I can only get about 1 hours worth of recording before the battery dies.
The Best Rig For The Camera And Microphone
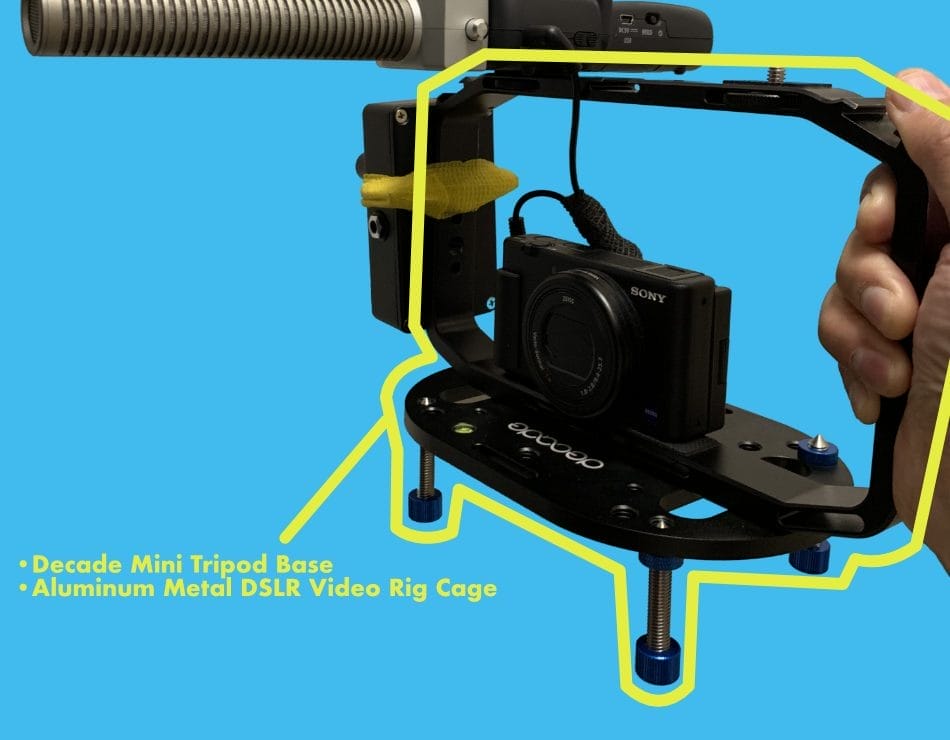
This is how I’m put it all together.
My Personal Experience
The mini tripod base, isn’t really a tripod. It’s got four legs. But, I really like this because it doesn’t tip over. My toddler has yet to knock it over.
The rig cage is super-durable and connects to the base very easily. There’s also a lot of options for connecting other things, should I want to built this out and improve on my setup in the future.
Pros:
- Once everything is setup, I can carry this setup anywhere. It’s very portable.
- I can connect many things to it.
- It’s a stable setup that hasn’t tipped over for me yet.
Cons:
- The legs of the base don’t lock. They are screws. So they will adjust from time to time. If you’re leaving it on your desktop, like me, then it won’t be too much of a problem.
Optional Gear To Make Your Bass Guitar Videos 1% Better
Lately, one of the studio setup ideas I’ve been exploring is having a limiter pedal in my chain, just before the bass connects to the Zoom H5. That way, my signal is even more clean and free of distortion.
When I look back on my past videos, there will be times I’ll hear my bass guitar peak and there will be distortion. I’m not trying to be perfect, but I already own an awesome limiter pedal. So, I figured it’s worth the try.
I’ll be testing this out with my upcoming videos.
This is really an optional thing to add, because you can get great results with just the gear I mentioned above. And, if you take the time and have the patience to tweak things the sound can even be that much better.
Here’s what I’m using:

My Personal Experience
The Keeley Bassist Compressor and Limiting Amplifier Pedal is high-quality. There is a slight coloration to the sound that I experience. But, the coloration isn’t in a bad way. It definitely improves the sound of my bass guitar for my videos.
Pros:
- Takes a 9V battery. Less cables is always a plus for me.
- Limits the signal from peaking. And there’s a light to show you that it’s working.
Cons:
- It’s one more thing you have to plug in. I’m really trying to keep things as simple as possible. So not really a con in regards to the pedal, but more on the workflow.
Conclusion
You don’t have to come on intensely to make an impression on YouTube. Stripped-back videos with minimal commentary and a warm tone perform incredibly well. That plays right into our hands as bassists. That means, you can get started on YouTube making high quality videos with little-to-no video editing necessary from complicated and expensive software like Adobe Premiere Pro and Final Cut Pro.
What’s really important is that you’re experiencing minimal friction to press that record button, because showing up consistently has great impact. Having an easy setup is the key.
So, what are you waiting for? It’s time to get started on your new YouTube video setup.
Want more gear recommendations that make creating, practicing, and playing feel effortless? Explore the full Gear Reviews category →
Frequently Asked Questions
What is the minimum viable YouTube setup for recording bass guitar?
A point-and-shoot camera, a clean audio source (such as a Zoom H5), and a stable camera rig provide everything needed for high-quality audio-video recording with minimal friction.
Do I need external lighting to film bass guitar YouTube videos?
Not if you use a camera with excellent low-light performance like the Sony ZV-1. Good indoor lighting is often enough for clean, clear footage.
Should I record bass DI or with a microphone?
Recording DI directly into a Zoom H5 or similar interface gives the cleanest results, removes room noise, and allows for late-night recording without disturbing others.
How can I avoid syncing audio and video in post-production?
Use a recorder like the Zoom H5 that outputs audio directly into the camera’s line input. This embeds the final audio in the video file in real time.
Is a limiter pedal necessary for YouTube bass videos?
Not required, but helpful. A limiter like the Keeley Bassist prevents clipping during energetic playing and keeps your signal clean and consistent.

