How to Solo Over Rhythm Changes Without Chasing Every Chord

Solo over Rhythm Changes - Image of chaotic lights by Mikita Yo
Share

Rhythm Changes is one of the most iconic and widely used progressions in jazz. Based on George Gershwin’s “I Got Rhythm,” the form is fast, fun, and famously tricky.

If you have ever frozen when asked to solo over fast-moving chords, you are not alone.

But, here’s the good news… you don’t have to outline every passing chord to create a convincing solo.

In this lesson, I’ll show you how to simplify the A section into a few larger sounds you can hear, find, and use while the music is moving.

You’ll learn how to:

  • establish B♭6 as your central sound;
  • turn that sound into a musical statement;
  • bring out important harmonic destinations;
  • simplify the dominant cycle in the bridge;
  • add chromaticism and blues language without abandoning your original idea;
  • practice the complete process without overwhelming yourself.

The goal is not to ignore the chord changes. It’s to reduce how many separate decisions you have to make while the music is moving.

The Simplest Way to Solo Over Rhythm Changes

For the A sections, stop trying to outline every chord separately.

Treat the opening of the progression as one larger B♭6 sound. Create melodies using the notes:

B♭, C, D, F, and G

These are the notes of B♭ major pentatonic and give you a small, familiar collection of notes from which you can generate several melodic ideas.

Then bring out the harmony at a few important moments:

  1. Treat B♭6 as the central sound through the opening four bars.
  2. Let B♭7 lead you toward E♭6 in bars 5–6.
  3. Use F7 near the end of the section to create tension that resolves naturally to B♭6.
  4. On the bridge, follow the dominant cycle as one connected movement.

You’re not replacing the original progression. You’re organizing it into a smaller number of sounds you can access while improvising.

How To Solo Over Rhythm Changes (A Super-Easy Way For Beginners)

What Are Rhythm Changes?

Rhythm Changes is a 32-bar AABA form based on the chord progression from George Gershwin’s “I Got Rhythm.”

Each A section contains variations of the familiar:

I–vi–ii–V

In B♭, that begins as:

B♭6–G7 | Cm7–F7

The bridge moves through a cycle of dominant chords:

D7 → G7 → C7 → F7

Musicians have created many substitutions and variations for Rhythm Changes, but the form’s larger harmonic movement remains recognizable.

Here is the iReal Pro variation used in this lesson:
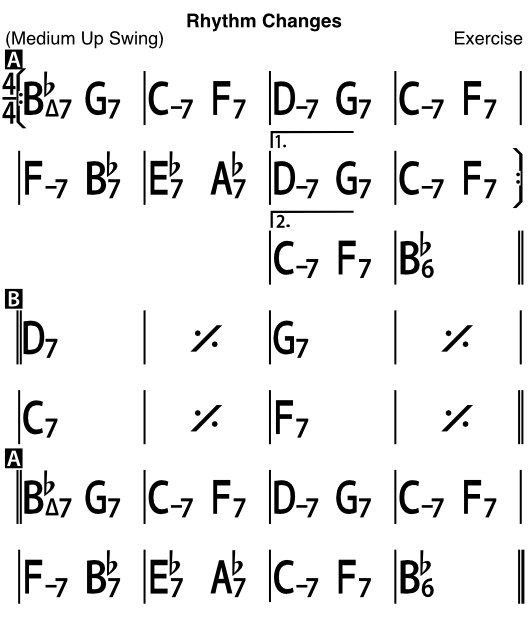
Rhythm Changes (Basic) - Chord Chart
A basic Rhythm Changes A section from iReal Pro that you might encounter when jamming with other musicians

The A section is:

BarFirst-ending A sectionSecond-ending variation
1B♭maj7 – G7Same
2Cm7 – F7Same
3Dm7 – G7Same
4Cm7 – F7Same
5Fm7 – B♭7Same
6E♭maj7 – A♭7Same
7Dm7 – G7Cm7 – F7
8Cm7 – F7B♭6

This version differs slightly from other common Rhythm Changes charts. That’s normal. Musicians frequently alter the turnaround chords, chord qualities, and endings while preserving the larger form.

Although this chart uses B♭maj7 and E♭maj7, I’ll use B♭6 and E♭6 as central melodic shapes. I’m not suggesting that these shapes literally replace every chord. I’m simply using them to organize several fast-moving chords into a smaller number of sounds that are easier to access while improvising.

Why Fast-Moving Chords Make Bass Players Freeze

When chords change every two beats, it can feel as though you must find a new scale or arpeggio for every symbol on the page.

But that creates a lot of mental work:

  • identify the chord;
  • remember its notes;
  • locate those notes on the bass;
  • choose something to play;
  • prepare for the next chord;
  • repeat the process before the moment is gone.

By the time you have calculated an answer, the music has already moved somewhere else, and now you’re in catch-up mode.

I used to think the problem was a lack of theoretical knowledge. But, I’ve found that that’s not always the case.

You may already know the scales, arpeggios, and chord tones.

The real challenge is accessing that information quickly enough to create and continue a musical idea.

That is why we are going to organize the progression around a different strategy:

Establish the sound → Create a statement → Move toward a destination

Step 1: Establish One Central Sound

Rhythm Changes contains several chords, but you don’t have to treat every chord as a separate improvisational problem.

Start by hearing the opening four bars as one larger B♭ sound.

Use a B♭6 shape as your home base (a 6 shape based on the tonic has a very strong feeling of “home”):

B♭, D, F, and G

You can extend that shape by adding C:

B♭, C, D, F, and G

This gives you the B♭ major pentatonic collection.

Here’s the core idea: Instead of resetting your thinking every time the chord changes, stay connected to this central sound.

The chords underneath your line will change how these notes feel. Some notes will sound stable. Others will create temporary tension. You don’t have to react to every tension immediately.

Your first goal is simply to hear B♭6 as home.

The reduction does not remove the original chords. It groups their motion into a smaller number of destinations you can follow while improvising.

Rhythm Changes - A Section simplified approach
A simplified approach using B♭6, E♭6, the B♭ blues scale, and a diminished shape beginning on G♭.

Notice how much easier it is to generate melodic statements when the fast-moving chords are organized into a few larger sounds!

Step 2: Turn the Sound Into a Musical Statement

Knowing which notes work is only the beginning.

You still need to turn those notes into something that sounds intentional.

Choose one entry point from your B♭6 shape. For example, begin on D. Then create a short phrase using only two or three additional notes.

You can create several statements from the same shape by changing:

  • the rhythm;
  • the starting note;
  • the direction;
  • the articulation;
  • the register;
  • the phrase length;
  • the entry point;
  • the final note.

You don’t need a new scale for every new idea.

One shape can generate many distinct statements when you change how you phrase it.

Try creating a short phrase, leaving some space, and then repeating the beginning with a different ending. The repeated material gives the listener something recognizable, while the changed ending allows your idea to continue developing.

This is the difference between merely choosing correct notes and learning to create a melodic line.

Step 3: Bring Out Important Harmonic Destinations

Once you can create a statement from the central B♭6 sound, begin making selected chord movements more audible.

You still don’t have to outline every passing chord.

Choose a few important destinations and let your statement move toward them.

Move Through Fm7–B♭7 Into E♭ Major

In bar 5, Fm7–B♭7 creates a ii–V progression leading into E♭maj7 in bar 6.

B♭7 functions as V7 of IV. Its A♭ distinguishes it from the B♭ major sound and creates a clear pull toward E♭maj7.

Try continuing your B♭6 statement through Fm7. When B♭7 arrives, introduce A♭, then resolve toward a chord tone of E♭maj7:

E♭, G, B♭, or D

If you are using E♭6 as your simplified melodic shape, you can also use C:

E♭, G, B♭, or C

You don’t have to stop your phrase and begin again. Let one of those notes become the next destination of the statement you already started.

Note: The A♭7 in the second half of bar 6 is another passing dominant sound. It creates chromatic movement into the turnaround that follows. You can outline it if you hear it clearly, but you don’t have to assign it an entirely new improvisational strategy during this first reduction.

One more note: Be careful when sustaining G from E♭maj7 after A♭7 arrives. A♭7 contains G♭, so holding G against it creates a pronounced clash. That tension isn’t necessarily wrong, but you should hear it as tension rather than treating G as a neutral note across the entire bar.

Use F7 to Return Home

Near the end of the A section, F7 creates tension that leads back to B♭6.

The notes of F7 are:

F, A, C, and E♭

The 3rd and 7th—A and E♭—are especially useful because they clearly define the dominant sound.

Try one of these simple resolutions:

  • A → B♭
  • E♭ → D
  • C → B♭
  • C → D

A and E♭ are the guide tones of F7. Their resolutions into B♭ and D make the return to the tonic especially clear. C is the 5th of F7, but it can also move smoothly into B♭ or D.

These small resolutions make the return to B♭ audible without requiring you to play a complete F7 arpeggio.

Add a Rootless F7♭9 Sound

You can create more tension by using an A diminished 7th arpeggio:

A, C, E♭, G♭

These notes are the 3rd, 5th, 7th, and ♭9 of F7.

That makes A diminished 7th a useful rootless F7♭9 sound.

Note: Diminished seventh chords are symmetrical. So you can access this same collection from any of its notes.

It’s commonly labeled A diminished 7th here because A is the 3rd of F7. Personally, I often visualize the shape from G♭, the ♭9 of F7, because that note sits physically close to the F root on the fretboard.

Whether you enter from A or G♭, the pitch collection is the same:

A, C, E♭, G♭

So use whatever works best for you.

Because the diminished shape contains strong tension, even a short fragment can make the return to B♭6 feel deliberate.

The larger route is now:

B♭6 → E♭6 → F7 → B♭6

Keep in mind, the original chords continue moving underneath you. You’re simply just organizing them into fewer harmonic decisions.

Simplify the Rhythm Changes Bridge

The bridge creates contrast by moving through four dominant chords:

D7 → G7 → C7 → F7

Each chord lasts two bars in the basic form.

The most direct approach is to hear and practice this dominant cycle as one connected movement rather than four isolated scales.

Start by playing the roots:

D → G → C → F

Then add the 3rd and 7th of each chord:

Chord3rd7th
D7F♯C
G7BF
C7EB♭
F7AE♭

Look for small movements between these notes.

Guide tones are usually the 3rd and 7th of a chord. A shell voicing combines the root with these essential chord tones. Because they define the chord’s quality and often move smoothly into the next chord, they can help your line follow the harmony without requiring you to play every arpeggio from its root.

Use those guide tones as destinations inside a longer statement.

Don’t think:

Now I need a D7 lick. Now I need a G7 lick. Now I need a C7 lick.

Instead, listen for where one statement can move next.

An Optional Chromatic Route

Once you can hear the original dominant cycle, experiment with alternating tritone substitutions:

A♭7 → G7 → G♭7 → F7

In this variation:

  • A♭7 substitutes for D7.
  • G7 remains unchanged.
  • G♭7 substitutes for C7.
  • F7 remains unchanged.

This creates a descending chromatic route while preserving the dominant function of the bridge.

Rhythm Changes (Basic) - B Section simplified
Rhythm Changes bridge simplified with alternating tritone substitutions descending chromatically.

Treat this as a variation, not the first thing you must learn.

Practice establishing the original dominant cycle first. And you can do this with just triads. Then use the chromatic route as another way to hear and organize the movement.

Add Chromaticism Without Abandoning the Statement

Once you have a clear statement, you can add chromaticism without starting over.

Choose a destination note from your B♭6 shape and approach it by a half-step above or below.

For example:

  • approach D from D♭ or E♭;
  • approach F from E or G♭;
  • approach B♭ from A or B.

The chromatic note creates tension. The destination gives that tension meaning.

An approach note is not a separate musical idea. It is a way of directing the statement you already created toward a specific note.

This allows you to introduce bebop-style chromaticism while maintaining a clear melodic thread.

Add Blues Language as a Contrasting Color

You can also introduce the B♭ blues scale:

B♭, D♭, E♭, E, F, A♭

Use it as a contrasting color instead of treating it as an entirely separate system.

Insert a short blues gesture, then return to your central B♭6 sound or continue toward the next harmonic destination.

For example:

  • move from D♭ into D;
  • move from E into F;
  • use A♭ to create the B♭7 sound leading into E♭6.

This lets blues language develop your original statement instead of replacing it.

You don’t need to fill the entire solo with blues vocabulary. One well-placed gesture may be enough to change the character of the phrase.

A Practical Rhythm Changes Practice Sequence

Don’t try to practice every concept at once.

Build the process in layers.

1. Play the Complete Progression

Play through the original A-section chords slowly:

B♭maj7–G7 | Cm7–F7 | Dm7–G7 | Cm7–F7 | Fm7–B♭7 | E♭maj7–A♭7 | Dm7–G7 | Cm7–F7

The second ending replaces the final two bars with Cm7–F7 | B♭6.

Listen to the full harmonic movement before reducing it.

You need to hear what you are simplifying.

2. Play Only the Larger Destinations

Reduce the progression to its larger route:

B♭6 → E♭6 → F7 → B♭6

Don’t create a solo yet.

Play the chord tones, sing the roots, and listen to how the larger sounds move.

3. Establish the B♭6 Sound

Loop the first four bars.

Improvise using only:

B♭, C, D, F, and G

Spend several choruses listening to how these notes interact with the moving chords.

Don’t add more material simply because the note collection feels small.

4. Create One Statement

Choose three or four notes from the B♭6 shape and create a short phrase.

Repeat it while changing only one element:

  • the rhythm;
  • the starting note;
  • the direction;
  • the register;
  • or the ending.

Your goal is to generate multiple ideas from one familiar shape.

5. Move the Statement Toward E♭6

Continue your B♭6 statement into bar 5.

Introduce A♭ over B♭7, then target a note from your E♭6 shape as E♭maj7 arrives in bar 6.

Listen for the statement moving into the destination instead of stopping at the bar line.

6. Create the Return Through F7

During the final turnaround, target A or E♭ from F7.

Resolve that tension into B♭6.

Practice the resolution until you can hear it before you play it.

7. Practice the Bridge Separately

Loop the bridge and begin with the roots:

D → G → C → F

Then add the 3rd and 7th of each dominant chord.

Connect the guide tones using the smallest available movement.

Only after you can hear the original cycle should you experiment with the chromatic tritone-substitution route.

8. Reassemble the Form

Play through the complete AABA form.

Keep B♭6 central during the A sections. Let the dominant cycle create contrast during the bridge.

Focus on continuing ideas through the form rather than demonstrating every concept you practiced.

Stop Starting Over at Every Chord

The real challenge is not knowing which scales and arpeggios work.

It is accessing them quickly enough to create and continue an idea while the music is moving.

That is what you are practicing here:

  • start with a shape you can already find
  • turn it into a musical statement
  • create a route into what comes next

Shape to Statement helps you develop that process deliberately, so changing chords no longer force you to stop, reset, and search again.

Colorful cloudy background

Reduce Mental Friction

You already know more than you can access in the moment.

Shape to Statement helps you turn the theory, shapes, and vocabulary you already know into musical ideas you can access in real time.

Frequently Asked Questions

What are Rhythm Changes in jazz?

Rhythm Changes is a 32-bar AABA form based on George Gershwin’s “I Got Rhythm.”

The A sections usually contain variations of I–vi–ii–V in B♭. The bridge moves through the dominant cycle D7–G7–C7–F7.

The exact substitutions may change from arrangement to arrangement, but the larger form and harmonic movement remain recognizable.

Why is soloing over Rhythm Changes difficult?

The chords frequently change every two beats. If you try to calculate a different scale or arpeggio for every chord, the amount of information can become overwhelming.

Reducing the A section into a central B♭6 sound and a few important destinations gives you fewer harmonic decisions to manage in real time.

Does simplifying the progression mean ignoring the chord changes?

No.

The original progression continues underneath your line. The reduction organizes those chords into larger sounds and destinations.

Once you can hear and navigate the reduced route, you can bring more of the original harmony into your lines.

What is the simplest scale for the A section?

B♭ major pentatonic is a practical starting point:

B♭, C, D, F, G

These notes establish a B♭6 sound and give you a small collection of material from which to create melodic statements.

The goal is not to run the scale continuously. Use the notes to create short phrases with clear rhythm, direction, and space.

How can I make the chord changes more audible?

Choose a few important harmonic destinations.

Let B♭7 lead into E♭6 in bars 5–6. Use the 3rd or 7th of F7 to create tension that resolves into B♭6.

Guide tones and small melodic movements can communicate the harmony without requiring you to outline every chord completely.

How do I add bebop chromaticism?

Choose a target note and approach it by a half-step above or below.

The chromatic note should lead somewhere. Treat it as movement into a destination rather than an unrelated extra note.

You can also use A diminished 7th—A, C, E♭, and G♭—as a rootless F7♭9 sound resolving into B♭6.

Can I use the blues scale over Rhythm Changes?

Yes.

The B♭ blues scale can add contrast and expression during the A sections. Use short blues gestures between statements created from the central B♭6 sound.

Returning to B♭6 or moving toward a clear harmonic destination helps the blues material remain connected to the progression.

What should I practice first?

Begin with the original progression so you can hear what is happening.

Then reduce the A section to B♭6, E♭6, and F7. Create one statement from B♭6 before adding harmonic destinations, chromaticism, substitutions, or additional scales.

Add one layer at a time.